Account administrators are able to add new users and modify existing users in the Jet Hub. New users can be added to view reporting, access billing or manage phone numbers and callflows. Existing users can also be modified to grant more access or restrict current access.
In this article we will cover:
Overview of User Roles
Jet Hub has 3 user roles - Account Admin, Standard User and Billing User. Below is a list of roles and the access level of each.
Account Admin
- Full View and Edit privileges to all call management and reporting features.
- View or Edit any Callflows, Phone Users or Queues.
- Authorised to make changes to this account when speaking to Jet Support, including adding or removing services.
- No access to Billing unless you also have the Billing role, however, you will see any account notices such as overdue payments, etc.
Standard User
- View Phone Numbers page and general reports.
- Edit Service Names but not View or Edit any Callflows, Phone Users or Queues.
- Cannot make any changes to the account when speaking to Jet Support.
Billing User
- Access to the Invoices & Payments screen to manage your account's invoicing needs and make payments.
- No View or Edit access to any other part of Jet Hub.
- Access to update the invoice details with Jet Support, but not to make changes to numbers or services (including cancelling the account).
Note - Users can be given access to more than one role. E.g. Account Admin and Billing User.
These permissions also apply when speaking to Jet Support.
How to Add a New Jet Hub User
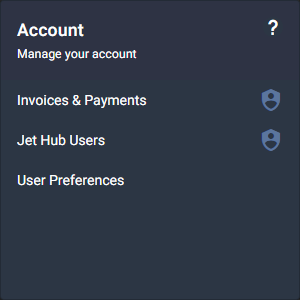
Step 1 - Under the Account menu, select Jet Hub Users.
Step 2 - Click on Invite User in the top right. You will need to complete an MFA authorisation through your email.

Step 3 - Enter the email address of the person you want to add. Choose the permissions you would like to grant this new user, and click Invite.
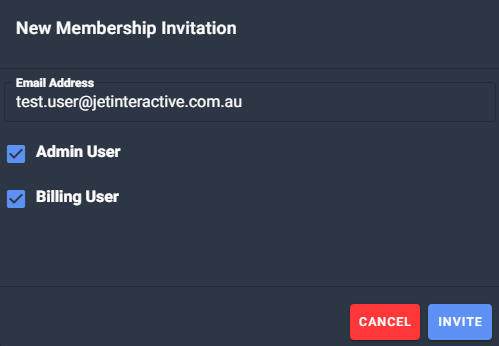
Note - If you do not tick any permissions they will be added as a Standard User.
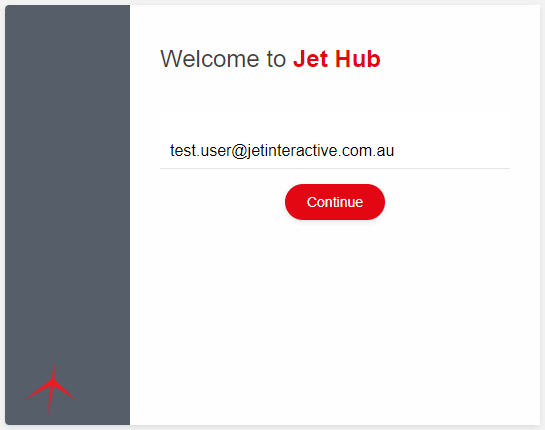
Step 4 - The person you invited will now receive an email inviting them to access Jet Hub for your account. They can then click on the Continue button in this email to register their Jet Hub access.
Step 5 - On the log in screen, the new user will enter in the email address that received the invite.
If this user already exists on another account, they will be asked to log in using their existing user details.
If this is a new user, they will be asked to either create a password or sign up using their Google account.
Once you have either chosen a password or registered with Google, you will automatically be logged into Jet Hub.
How to Modify User Permissions
If you are an account Admin, you can change the permissions of another user.
This includes the permissions of other account Admins, so please be aware of the consequences of making any adjustments to these users.
Step 1 - Under the Account menu, select Jet Hub Users.
Step 2 - You will then see a list of your users, their permissions and some user details. These details are explained in the table below.

Note - Some information has been hidden for privacy.
Step 3 - Find the user you would like to modify and select the Update Permission icon under Actions.

Step 4 - Select or deselect the permissions you would like to set and then click on UPDATE to save the changes.

Note - To make a standard user de-select both Admin User and Billing User.
Please allow up to 15 minutes for any changes to become effective. Any users you update will need to log out and then log back into Jet Hub for the changes to be reflected.
Glossary
| Terminology | Explanation |
| The email address of the user. | |
| Active |
If the user has logged in before or not.
|
| Roles |
Users permission level
If no permissions are displayed here the user is a Standard User. |
| Invitation Sent | The date the users invitation was sent. |
| Invitation Accepted | The date the user first logged into Jet Hub. |
| Lasted Logged In |
The date the user last logged into Jet Hub. |
| Action |
Actions that can be taken on the user.
|